注:这是2018年2月写的旧博文,转载到此。

Redis使用了一个称为“A simple event-driven programming library”的自制异步事件库(以下简称“AE”)。整个事件库的代码量少于1k行,是个优秀的C异步事件库学习材料。

源码结构

版本 Redis 4.0.8

redis的src目录下,ae开头的几个文件就是AE事件库的源码。

文件 用途
ae.h AE事件库接口定义
ae.c AE事件库实现
ae_epoll.c epoll绑定
ae_evport.c evport绑定
ae_kqueue.c kqueue绑定
ae_select.c select绑定

文件数量有点多,我们把IO多路复用的绑定都“精简”掉。在“ae.c”的开头有这么一段代码:

1
2
3
4
5
6
7
8
9
10
11
12
13
14
15
/* Include the best multiplexing layer supported by this system.
* The following should be ordered by performances, descending. */
#ifdef HAVE_EVPORT
#include "ae_evport.c"
#else
#ifdef HAVE_EPOLL
#include "ae_epoll.c"
#else
#ifdef HAVE_KQUEUE
#include "ae_kqueue.c"
#else
#include "ae_select.c"
#endif
#endif
#endif

Redis根据所处系统的不同,包含不同的IO多路复用实现代码。每种IO多路复用都实现了以下的接口:

1
2
3
4
5
6
7
8
struct aeApiState;
static int aeApiCreate(aeEventLoop *eventLoop);
static int aeApiResize(aeEventLoop *eventLoop, int setsize);
static void aeApiFree(aeEventLoop *eventLoop);
static int aeApiAddEvent(aeEventLoop *eventLoop, int fd, int mask);
static void aeApiDelEvent(aeEventLoop *eventLoop, int fd, int mask);
static int aeApiPoll(aeEventLoop *eventLoop, struct timeval *tvp);
static char *aeApiName(void);

任意的IO多路复用技术,只要封装出以上的接口就可以被AE事件库作为底层实现使用。我们“精简”掉4个IO多路复用绑定代码之后,就剩下“ae.h、ae.c”这两个文件了。

AE事件模型

AE异步事件库支持以下的事件类型:

  • 文件事件
  • 定时器事件

Redis本身是一个KV数据库,主要就是接收客户端的查询请求并返回结果,以及对KV数据的有效性维护。所以文件事件(IO事件)和定时器事件就足以支撑服务端的全部功能。

文件(IO)事件

与文件事件相关的定义和接口有:

1
2
3
4
5
6
7
8
9
10
11
12
13
14
15
16
#define AE_NONE 0
#define AE_READABLE 1
#define AE_WRITABLE 2

typedef void aeFileProc(struct aeEventLoop *eventLoop, int fd, void *clientData, int mask);

/* File event structure */
typedef struct aeFileEvent {
int mask; /* one of AE_(READABLE|WRITABLE) */
aeFileProc *rfileProc;
aeFileProc *wfileProc;
void *clientData;
} aeFileEvent;

int aeCreateFileEvent(aeEventLoop *eventLoop, int fd, int mask, aeFileProc *proc, void *clientData);
void aeDeleteFileEvent(aeEventLoop *eventLoop, int fd, int mask);

定时器事件

与定时器事件相关的定义和接口有:

1
2
3
4
5
6
7
8
9
10
11
12
13
14
15
16
17
18
typedef int aeTimeProc(struct aeEventLoop *eventLoop, long long id, void *clientData);
typedef void aeEventFinalizerProc(struct aeEventLoop *eventLoop, void *clientData);

/* Time event structure */
typedef struct aeTimeEvent {
long long id; /* time event identifier. */
long when_sec; /* seconds */
long when_ms; /* milliseconds */
aeTimeProc *timeProc;
aeEventFinalizerProc *finalizerProc;
void *clientData;
struct aeTimeEvent *next;
} aeTimeEvent;

long long aeCreateTimeEvent(aeEventLoop *eventLoop, long long milliseconds,
aeTimeProc *proc, void *clientData,
aeEventFinalizerProc *finalizerProc);
int aeDeleteTimeEvent(aeEventLoop *eventLoop, long long id);

每种事件类型都定义了回调函数、事件结构体、事件添加/删除接口,以支持该类型事件的操作。

AE异步事件库的典型用法

下面的例子使用AE事件库进行网络读写和定时器操作:

1
2
3
4
5
6
7
8
9
10
11
12
13
14
15
16
17
18
19
20
21
22
23
24
25
26
27
28
29
30
31
32
33
34
35
36
37
38
39
40
41
42
43
44
45
46
47
48
49
50
51
52
53
54
55
56
57
58
59
60
61
62
63
64
65
66
67
68
69
70
71
72
73
74
/* file: example-libae.c */
#include <stdio.h>
#include <unistd.h>
#include <time.h>
#include <ae.h>

static const int MAX_SETSIZE = 64;
static const int MAX_BUFSIZE = 128;

static void
file_cb(struct aeEventLoop *eventLoop, int fd, void *clientData, int mask)
{
char buf[MAX_BUFSIZE] = {0};
int rc;

rc = read(fd, buf, MAX_BUFSIZE);
if (rc < 0)
{
aeStop(eventLoop);
return;
}
else
{
buf[rc - 1] = '\0'; /* 最后一个字符是回车 */
}
printf("file_cb, read %s, fd %d, mask %d, clientData %s\n", buf, fd, mask, (char *)clientData);
}

static int
timer_cb(struct aeEventLoop *eventLoop, long long id, void *clientData)
{
printf("timer_cb, timestamp %ld, id %lld, clientData %s\n", time(NULL), id, (char *)clientData);
return (5 * 1000);
}

static void
timer_fin_cb(struct aeEventLoop *eventLoop, void *clientData)
{
printf("timer_fin_cb, timestamp %ld, clientData %s\n", time(NULL), (char *)clientData);
}

int main(int argc, char *argv[])
{
aeEventLoop *ae;
long long id;
int rc;

ae = aeCreateEventLoop(MAX_SETSIZE);
if (!ae)
{
printf("create event loop error\n");
goto err;
}

/* 添加文件IO事件 */
rc = aeCreateFileEvent(ae, STDIN_FILENO, AE_READABLE, file_cb, (void *)"test ae file event");

/* 添加定时器事件 */
id = aeCreateTimeEvent(ae, 5 * 1000, timer_cb, (void *)"test ae time event", timer_fin_cb);
if (id < 0)
{
printf("create time event error\n");
aeDeleteEventLoop(ae);
goto err;
}

aeMain(ae);

aeDeleteEventLoop(ae);
return (0);

err:
return (-1);
}

可以把这个文件放在Redis的deps/hiredis/examples目录下,修改hiredis目录的Makefile

1
2
3
AE_DIR=/path/to/redis/src
example-libae: examples/example-libae.c $(STLIBNAME)
$(CC) -o examples/$@ $(REAL_CFLAGS) $(REAL_LDFLAGS) -I. -I$(AE_DIR) $< $(AE_DIR)/ae.o $(AE_DIR)/zmalloc.o $(AE_DIR)/../deps/jemalloc/lib/libjemalloc.a -pthread $(STLIBNAME)

编译执行看一下效果:

1
2
3
4
5
6
$ make example-libae
$ examples/example-libae
123456
file_cb, read 123456, fd 0, mask 1, clientData test ae file event
timer_cb, timestamp 1519137082, id 0, clientData test ae time event
^C

可以看到AE异步事件库的使用还是比较简单,没有复杂的概念和接口。

AE事件循环

一个异步事件库除了事件模型外,最重要的部分就是事件循环了。来看看AE的事件循环“aeMain”是怎么实现的:

1
2
3
4
5
6
7
8
9
/* file: ae.c */
void aeMain(aeEventLoop *eventLoop) {
eventLoop->stop = 0;
while (!eventLoop->stop) { /* 运行状态判断 */
if (eventLoop->beforesleep != NULL)
eventLoop->beforesleep(eventLoop); /* 事件循环前回调执行 */
aeProcessEvents(eventLoop, AE_ALL_EVENTS|AE_CALL_AFTER_SLEEP);
}
}

看来“aeProcessEvents”函数才是事件循环的主体:

1
2
3
4
5
6
7
8
9
10
11
12
13
14
15
16
17
18
19
20
21
22
23
24
25
26
27
28
29
30
31
32
33
34
35
36
37
38
39
40
41
42
43
44
45
46
47
48
49
/* file: ae.c */

int aeProcessEvents(aeEventLoop *eventLoop, int flags)
{
int processed = 0, numevents;

/* 如果啥事件都不关注,立即返回 */
if (!(flags & AE_TIME_EVENTS) && !(flags & AE_FILE_EVENTS)) return 0;

if (eventLoop->maxfd != -1 ||
((flags & AE_TIME_EVENTS) && !(flags & AE_DONT_WAIT))) {
int j;
aeTimeEvent *shortest = NULL;
struct timeval tv, *tvp;

/* 略去计算tvp的代码 */
…… ……

/* 调用IO多路复用接口 */
numevents = aeApiPoll(eventLoop, tvp);

/* 略去IO多路复用后回调执行代码 */
…… ……

for (j = 0; j < numevents; j++) { /* 循环处理IO事件 */
aeFileEvent *fe = &eventLoop->events[eventLoop->fired[j].fd];
int mask = eventLoop->fired[j].mask;
int fd = eventLoop->fired[j].fd;
int rfired = 0;

/* 执行读回调函数 */
if (fe->mask & mask & AE_READABLE) {
rfired = 1;
fe->rfileProc(eventLoop,fd,fe->clientData,mask);
}
/* 执行写回调函数 */
if (fe->mask & mask & AE_WRITABLE) {
if (!rfired || fe->wfileProc != fe->rfileProc)
fe->wfileProc(eventLoop,fd,fe->clientData,mask);
}
processed++;
}
}
/* 执行定时器事件 */
if (flags & AE_TIME_EVENTS)
processed += processTimeEvents(eventLoop);

return processed; /* return the number of processed file/time events */
}

在“aeProcessEvents”函数主体中,对于文件(IO)事件的处理逻辑已经比较清晰,调用IO多路复用接口并循环处理返回的有效文件描述符。定时器事件在“processTimeEvents”函数中处理:

1
2
3
4
5
6
7
8
9
10
11
12
13
14
15
16
17
18
19
20
21
22
23
24
25
26
27
28
29
30
31
32
33
34
35
36
37
38
39
40
41
42
43
44
45
46
47
48
49
50
51
52
53
54
/* file: ae.c */

static int processTimeEvents(aeEventLoop *eventLoop) {
int processed = 0;
aeTimeEvent *te, *prev;
long long maxId;
time_t now = time(NULL);

/* 发现系统时间修改过,为防止定时器永远无法执行,将定时器设置为立即执行 */
if (now < eventLoop->lastTime) {
te = eventLoop->timeEventHead;
while(te) {
te->when_sec = 0;
te = te->next;
}
}
eventLoop->lastTime = now;

prev = NULL;
te = eventLoop->timeEventHead;
maxId = eventLoop->timeEventNextId-1;
while(te) {
long now_sec, now_ms;
long long id;

/* 略去删除失效定时器代码 */
…… ……

/* 略去作者都注释说没什么用的代码囧 */
…… ……

aeGetTime(&now_sec, &now_ms);
if (now_sec > te->when_sec ||
(now_sec == te->when_sec && now_ms >= te->when_ms))
{
int retval;

id = te->id;
/* 执行回调函数 */
retval = te->timeProc(eventLoop, id, te->clientData);
processed++;
if (retval != AE_NOMORE) {
/* 需要继续保留的定时器,根据回调函数的返回值重新计算延迟时间 */
aeAddMillisecondsToNow(retval,&te->when_sec,&te->when_ms);
} else {
/* 无需保留的定时器,打上删除标识 */
te->id = AE_DELETED_EVENT_ID;
}
}
prev = te;
te = te->next;
}
return processed;
}

AE库的定时器事件很“简单粗暴”的使用了链表。新事件都往表头添加(详见“aeCreateFileEvent”函数实现),循环遍历链表执行定时器事件。没有使用复杂的时间堆和时间轮,简单可用,只是查找和执行定时器事件的事件复杂度都是O(n)。作者在注释中也解释说,现在基于链表的定时器事件处理机制已经足够Redis使用:

1
2
3
4
5
6
7
8
9
10
11
/* Search the first timer to fire.
* This operation is useful to know how many time the select can be
* put in sleep without to delay any event.
* If there are no timers NULL is returned.
*
* Note that's O(N) since time events are unsorted.
* Possible optimizations (not needed by Redis so far, but...):
* 1) Insert the event in order, so that the nearest is just the head.
* Much better but still insertion or deletion of timers is O(N).
* 2) Use a skiplist to have this operation as O(1) and insertion as O(log(N)).
*/

总结

从前面的分析可以看到,AE异步事件库本身的实现很简洁,却支撑起了业界最流行的KV内存数据库的核心功能。让我想起了业界的一句鸡汤,“要么架构优雅到不怕Bug,要么代码简洁到不会有Bug”。

参考

[1] 事件库之Redis自己的事件模型-ae,by C_Z

版权声明:自由转载-非商用-非衍生-保持署名(创意共享4.0许可证

注:这是2018年2月写的旧博文,转载到此。

事先声明,标题没有把“Python”错打成“Cython”,因为要讲的就是名为“Cython”的东西。

Cython是让Python脚本支持C语言扩展的编译器,Cython能够将Python+C混合编码的.pyx脚本转换为C代码,主要用于优化Python脚本性能或Python调用C函数库。由于Python固有的性能差的问题,用C扩展Python成为提高Python性能常用方法,Cython算是较为常见的一种扩展方式。

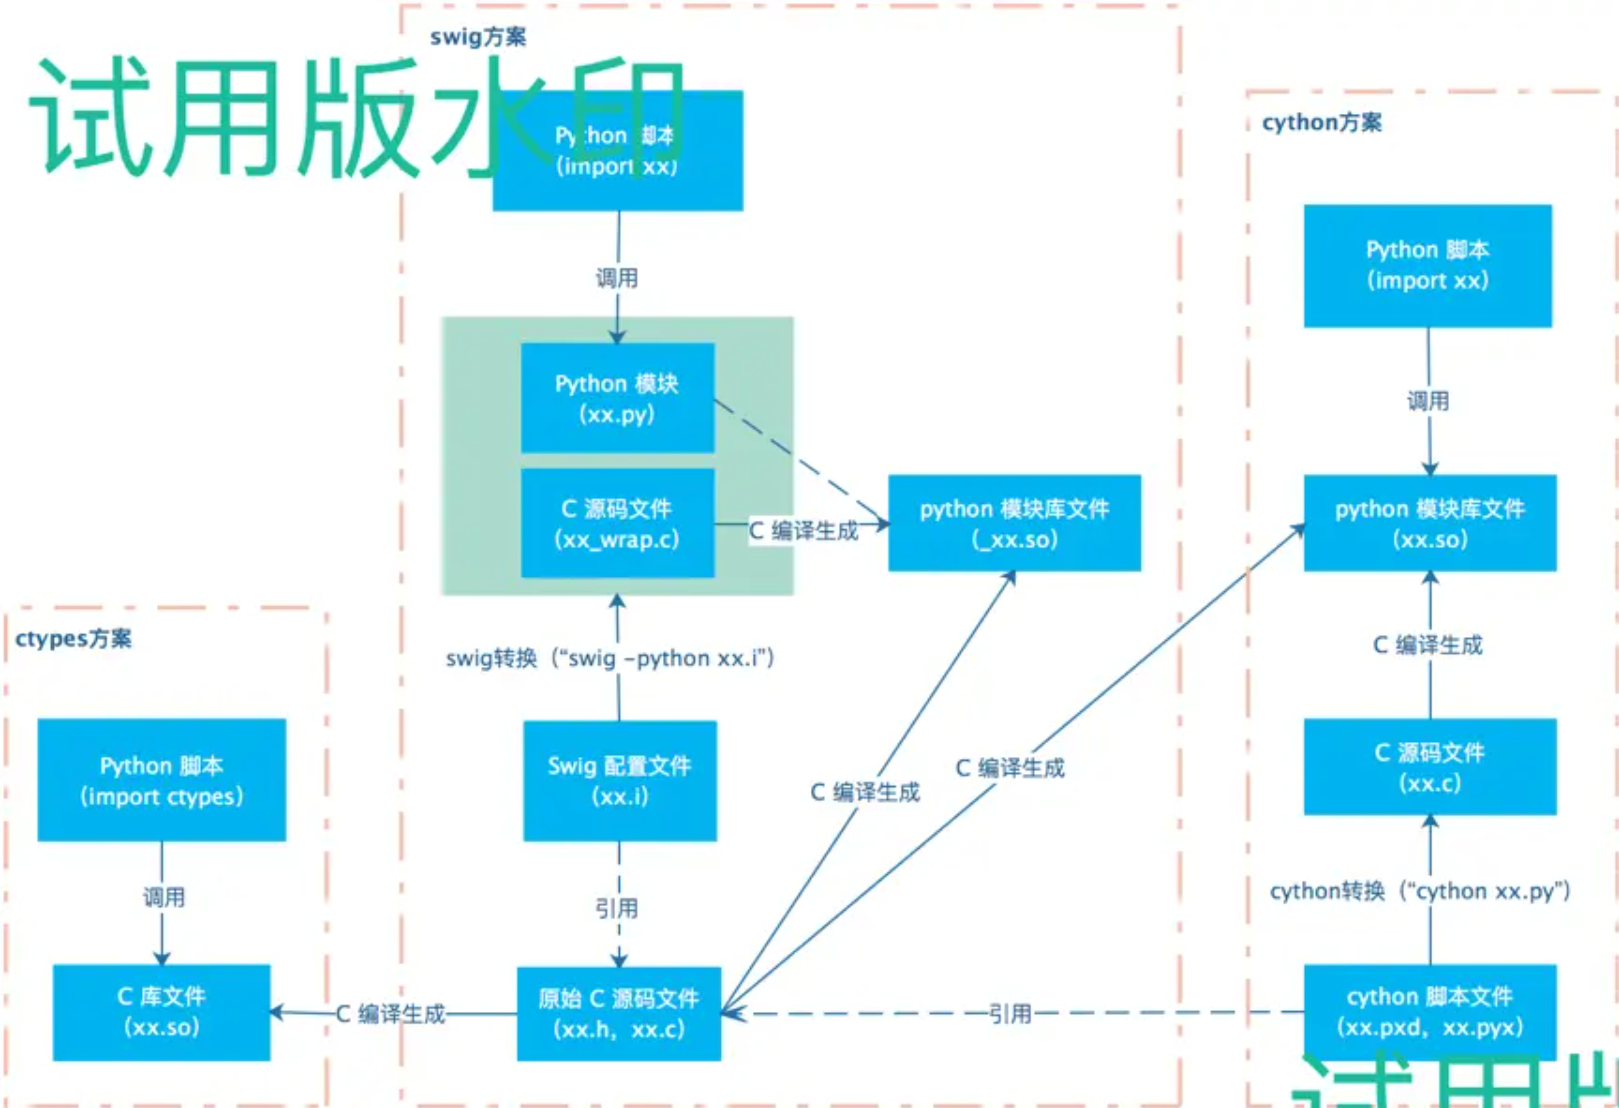
我们可以对比一下业界主流的几种Python扩展支持C语言的方案:
有试用版水印,是因为穷T_T

ctypes是Python标准库支持的方案,直接在Python脚本中导入C的.so库进行调用,简单直接。swig是一个通用的让高级脚本语言扩展支持C的工具,自然也是支持Python的。ctypes没玩过,不做评价。以c语言程序性能为基准的话,cython封装后下降20%,swig封装后下降70%。功能方面,swig对结构体和回调函数都要使用typemap进行手工编写转换规则,typemap规则写起来略复杂,体验不是很好。cython在结构体和回调上也要进行手工编码处理,不过比较简单。

Cython简单实例

我们尝试用Cython,让Python脚本调用C语言写的打印“Hello World”的函数,来熟悉一下Cython的玩法。

1
2
/*filename: hello_world.h */
void print_hello_world();
1
2
3
4
5
6
7
8
9
10
11
12
13
14
/*filename: hello_world.c */
#include <stdio.h>
#include "hello_world.h"

void print_hello_world()
{
printf("hello world...");
}

int main(int arch, char *argv[])
{
print_hello_world();
return (0);
}
1
2
3
4
5
6
7
#file: hello_world.pyx

cdef extern from "hello_world.h":
void print_hello_world()

def cython_print_hello_world():
print_hello_world()
1
2
3
4
5
6
7
8
9
10
11
12
13
14
15
16
#filename: Makefile
all: hello_world cython_hello_world

hello_world:
gcc hello_world.c -c hello_world.c
gcc hello_world.o -o hello_world

cython:
cython cython_hello_world.pyx

cython_hello_world: cython
gcc cython_hello_world.c -fPIC -c
gcc -shared -lpython2.7 -o cython_hello_world.so hello_world.o cython_hello_world.o

clean:
rm -rf hello_world hello_world.o cython_hello_world.so cython_hello_world.c cython_hello_world.o

用Cython扩展C,最重要的就是编写.pyx脚本文件。.pyx脚本是Python调用C的桥梁,.pyx脚本中即能用Python语法写,也可以用类C语法写。

1
2
3
4
5
6
$ make all    # 详细的编译过程可以看Makefile中的相关指令
$ python
>>> import cython_hello_world
>>> cython_hello_world.cython_print_hello_world()
hello world...
>>>

可以看到,我们成功的在Python解释器中调用了C语言实现的函数。

Cython的注意事项

所有工具/语言的简单使用都是令人愉快的,但是深入细节就会发现处处“暗藏杀机”。最近是项目需要扩展C底层库给Python调用,所以引入了Cython。实践过程中踩了很多坑,熬了很多夜T_T。遇到了以下几点需要特别注意的点:

  1. .pyx中用cdef定义的东西,除类以外对.py都是不可见的;
  1. .py中是不能操作C类型的,如果想在.py中操作C类型就要在.pyx中从python object转成C类型或者用含有set/get方法的C类型包裹类;
  1. 虽然Cython能对Python的str和C的“char *”之间进行自动类型转换,但是对于“char a[n]”这种固定长度的字符串是无法自动转换的。需要使用Cython的libc.string.strcpy进行显式拷贝;
  1. 回调函数需要用函数包裹,再通过C的“void *”强制转换后才能传入C函数。

1. .pyx中用cdef定义的类型,除类以外对.py都不可见

我们来看一个例子:

1
2
3
4
5
6
7
8
9
10
11
12
13
14
15
16
17
18
#file: invisible.pyx
cdef inline cdef_function():
print('cdef_function')

def def_function():
print('def_function')

cdef int cdef_value

def_value = 999

cdef class cdef_class:
def __init__(self):
self.value = 1

class def_class:
def __init__(self):
self.value = 1
1
2
3
4
5
#file: test_visible.py
import invisible

if __name__ == '__main__':
print('invisible.__dict__', invisible.__dict__)

输出的invisible模块的成员如下:

1
2
3
4
5
6
7
8
9
10
11
12
13
14
$ python invisible.py
{
'__builtins__': <module '__builtin__' (built-in)>,
'def_class': <class invisible.def_class at 0x10feed1f0>,
'__file__': '/git/EasonCodeShare/cython_tutorials/invisible-for-py/invisible.so',
'call_all_in_pyx': <built-in function call_all_in_pyx>,
'__pyx_unpickle_cdef_class': <built-in function __pyx_unpickle_cdef_class>,
'__package__': None,
'__test__': {},
'cdef_class': <type 'invisible.cdef_class'>,
'__name__': 'invisible',
'def_value': 999,
'def_function': <built-in function def_function>,
'__doc__': None}

我们在.pyx用cdef定义的函数cdef_function、变量cdef_value都看不到了,只有类cdef_class能可见。所以,使用过程中要注意可见性问题,不要错误的在.py中尝试使用不可见的模块成员。

2. .py传递C结构体类型

Cython扩展C的能力仅限于.pyx脚本中,.py脚本还是只能用纯Python。如果你在C中定义了一个结构,要从Python脚本中传进来就只能在.pyx手工转换一次,或者用包裹类传进来。我们来看一个例子:

1
2
3
4
5
6
7
8
/*file: person_info.h */
typedef struct person_info_t
{
int age;
char *gender;
}person_info;

void print_person_info(char *name, person_info *info);
1
2
3
4
5
6
7
8
9
//file: person_info.c
#include <stdio.h>
#include "person_info.h"

void print_person_info(char *name, person_info *info)
{
printf("name: %s, age: %d, gender: %s\n",
name, info->age, info->gender);
}
1
2
3
4
5
6
7
8
9
10
11
12
13
14
#file: cython_person_info.pyx
cdef extern from "person_info.h":
struct person_info_t:
int age
char *gender
ctypedef person_info_t person_info

void print_person_info(char *name, person_info *info)

def cyprint_person_info(name, info):
cdef person_info pinfo
pinfo.age = info.age
pinfo.gender = info.gender
print_person_info(name, &pinfo)

因为“cyprint_person_info”的参数只能是python object,所以我们要在函数中手工编码转换一下类型再调用C函数。

1
2
3
4
5
6
7
8
9
10
11
12
13
#file: test_person_info.py
from cython_person_info import cyprint_person_info

class person_info(object):
age = None
gender = None

if __name__ == '__main__':
info = person_info()
info.age = 18
info.gender = 'male'

cyprint_person_info('handsome', info)
1
2
$ python test_person_info.py
name: handsome, age: 18, gender: male

能正常调用到C函数。可是,这样存在一个问题,如果我们C的结构体字段很多,我们每次从.py脚本调用C函数都要手工编码转换一次类型数据就会很麻烦。还有更好的一个办法就是给C的结构体提供一个包裹类。

1
2
3
4
5
6
7
8
9
10
11
12
13
14
15
16
17
18
19
20
21
22
23
24
25
26
27
28
29
30
31
32
33
34
35
36
#file: cython_person_info.pyx
from libc.stdlib cimport malloc, free
cdef extern from "person_info.h":
struct person_info_t:
int age
char *gender
ctypedef person_info_t person_info

void print_person_info(char *name, person_info *info)

def cyprint_person_info(name, person_info_wrap info):
print_person_info(name, info.ptr)


cdef class person_info_wrap(object):
cdef person_info *ptr

def __init__(self):
self.ptr = <person_info *>malloc(sizeof(person_info))

def __del__(self):
free(self.ptr)

@property
def age(self):
return self.ptr.age
@age.setter
def age(self, value):
self.ptr.age = value

@property
def gender(self):
return self.ptr.gender
@gender.setter
def gender(self, value):
self.ptr.gender = value

我们定义了一个“person_info”结构体的包裹类“person_info_wrap”,并提供了成员set/get方法,这样就可以在.py中直接赋值了。减少了在.pyx中转换数据类型的步骤,能有效的提高性能。

1
2
3
4
5
6
7
8
9
#file: test_person_info.py
from cython_person_info import cyprint_person_info, person_info_wrap

if __name__ == '__main__':
info_wrap = person_info_wrap()
info_wrap.age = 88
info_wrap.gender = 'mmmale'

cyprint_person_info('hhhandsome', info_wrap)
1
2
$ python test_person_info.py 
name: hhhandsome, age: 88, gender: mmmale

3. python的str传递给C固定长度字符串要用strcpy

正如在C语言中,字符串之间不能直接赋值拷贝,而要使用strcpy复制一样,python的str和C字符串之间也要用cython封装的libc.string.strcpy函数来拷贝。我们稍微修改上一个例子,让person_info结构体的gender成员为16字节长的字符串:

1
2
3
4
5
6
/*file: person_info.h */
typedef struct person_info_t
{
int age;
char gender[16];
}person_info;
1
2
3
4
5
6
#file: cython_person_info.pyx
cdef extern from "person_info.h":
struct person_info_t:
int age
char gender[16]
ctypedef person_info_t person_info
1
2
3
4
5
6
7
8
9
#file: test_person_info.py
from cython_person_info import cyprint_person_info, person_info_wrap

if __name__ == '__main__':
info_wrap = person_info_wrap()
info_wrap.age = 88
info_wrap.gender = 'mmmale'

cyprint_person_info('hhhandsome', info_wrap)
1
2
3
4
5
6
7
8
9
$ make
$ python test_person_info.py
Traceback (most recent call last):
File "test_person_info.py", line 7, in <module>
info_wrap.gender = 'mmmale'
File "cython_person_info.pyx", line 39, in cython_person_info.person_info_wrap.gender.__set__
self.ptr.gender = value
File "stringsource", line 93, in carray.from_py.__Pyx_carray_from_py_char
IndexError: not enough values found during array assignment, expected 16, got 6

cython转换和make时候是没有报错的,运行的时候提示“IndexError: not enough values found during array assignment, expected 16, got 6”,其实就是6字节长的“mmmale”赋值给了person_info结构体的“char gender[16]”成员。我们用strcpy来实现字符串之间的拷贝就ok了。

1
2
3
4
5
6
7
8
9
10
11
12
#file: cython_person_info.pyx
from libc.string cimport strcpy
…… ……
cdef class person_info_wrap(object):
cdef person_info *ptr
…… ……
@property
def gender(self):
return self.ptr.gender
@gender.setter
def gender(self, value):
strcpy(self.ptr.gender, value)
1
2
3
$ make
$ python test_person_info.py
name: hhhandsome, age: 88, gender: mmmale

赋值拷贝正常,成功将“mmmale”拷贝给了结构体的gender成员。

4. 用回调函数作为参数的C函数封装

C中的回调函数比较特殊,用户传入回调函数来定制化的处理数据。Cython官方提供了封装带有回调函数参数的例子

1
2
3
//file: cheesefinder.h
typedef void (*cheesefunc)(char *name, void *user_data);
void find_cheeses(cheesefunc user_func, void *user_data);
1
2
3
4
5
6
7
8
9
10
11
12
13
14
15
16
17
//file: cheesefinder.c
#include "cheesefinder.h"

static char *cheeses[] = {
"cheddar",
"camembert",
"that runny one",
0
};

void find_cheeses(cheesefunc user_func, void *user_data) {
char **p = cheeses;
while (*p) {
user_func(*p, user_data);
++p;
}
}
1
2
3
4
5
6
7
8
9
10
#file: cheese.pyx
cdef extern from "cheesefinder.h":
ctypedef void (*cheesefunc)(char *name, void *user_data)
void find_cheeses(cheesefunc user_func, void *user_data)

def find(f):
find_cheeses(callback, <void*>f)

cdef void callback(char *name, void *f):
(<object>f)(name.decode('utf-8'))
1
2
3
4
5
6
import cheese

def report_cheese(name):
print("Found cheese: " + name)

cheese.find(report_cheese)

关键的步骤就是在.pyx中定义一个和C的回调函数相同的回调包裹函数,如上的“cdef void callback(char *name, void *f)”。之后,将.py中的函数作为参数传递给包裹函数,并在包裹函数中转换成函数对象进行调用。

扩展阅读

更进一步的研究Cython可以参考官方文档和相关书籍:

版权声明:自由转载-非商用-非衍生-保持署名(创意共享4.0许可证

注:这是2018年2月写的旧博文,转载到此。

Redis 协议

Redis客户端和服务端之间使用一种名为RESP(REdis Serialization Protocol)的二进制安全文本协议进行通信。RESP设计的十分精巧,下面是一张完备的协议描述图:
redis protocol

#举个栗子
用SET命令来举例说明RESP协议的格式。

1
2
redis> SET mykey "Hello"
"OK"

实际发送的请求数据:

1
*3\r\n$3\r\nSET\r\n$5\r\nmykey\r\n$5\r\nHello\r\n

实际收到的响应数据:

1
+OK\r\n

每种命令对应的回复类型,可以查询Redis官网的命令列表Command reference。更详细的协议说明请参考Redis官方协议规范Redis Protocol specification

参考

[1] 通信协议(protocol),http://redisdoc.com/topic/protocol.html

[2] Redis Protocol specification,https://redis.io/topics/protocol

版权声明:自由转载-非商用-非衍生-保持署名(创意共享4.0许可证

注:这是2020年1月写的旧博文,转载到此。

Anki是什么?

本文假定你是个Anki用户,并不会对Anki基础知识进行介绍。对Anki不熟悉的读者可以阅读Anki英文官网(Anki - powerful, intelligent flashcards),或Anki中国(Anki–近乎完美的记忆神器)的介绍内容。

正确使用牌组

“正确使用牌组”是官方 Anki 手册上对 Anki 牌组功能的使用建议,内容如下:

牌组被设计成将你的内容分成你想单独学习的大类,如英语、地理等等。 你可能会想创建许多小的牌组,以保持你的内容有条理,如“我的地理书第1章”,或“食品动词”,但这是不推荐的,有以下原因:

  • 许多小牌组意味着你最终会以可识别的顺序复习卡片。 无论是因为你依次点击每一个牌组(这是缓慢的),或你在一个单一的父级牌组上增加了一些牌组,你最终会看到所有的“第1章”或“食物动词”卡片在一起。 这使得回答卡片更容易,因为你可以从上下文猜测他们,从而导致较弱的记忆。 当你需要回忆单词或Anki外的短语时,你不会有充足的可被证明的相关内容。

  • Anki不是设计来处理许多牌组(超过几十个),它会慢下来,当你添加更多的–尤其是如果你在一个移动客户端的情况下。一些额外的牌组不会产生明显的差异,但是如果你有许多牌组,延误将开始增加。

使用标签和/或字段来分类内容,替代创建许多小的牌组,这是一个更好的主意。 例如替代创建一个“食物动词”,你可以把这些卡片添加到你的主要语言学习牌组,并用“食物”和“动词”来标记卡片。每个卡片可以有多个标签,这意味着你可以做的事情,如寻找所有的动词,或所有与食品有关的词汇,或所有的动词与食品有关。

对于那些喜欢保持非常有条理的,您可以添加字段到您的笔记分类的内容,如“书”,“页”等。 Anki支持特定字段的搜索,这意味着你可以做一个“图书搜索:‘我的书’页码:63”马上找到你要找的。

Anki的定制学习和筛选牌组特点使其特别强大,因为你可以从搜索条件创建临时牌组。这允许您在大多数时间(最佳内存)中将内容混合在一个单独的牌组上,同时也需要在特定的材料上创建临时牌组,例如在测试之前。一般的规则是,如果你总是希望能够单独学习一些内容,它应该是在一个正常的牌组上,如果你只是偶尔需要能够单独学习(测试,有压力时,等),标签/字段和过滤牌组更好。

由上可知,官方的建议是不要创建许多小分类牌组,使用几个单独学习的大类牌组即可。强迫症患者可以使用标签或字段来细分类内容,替代创建许多小分类牌组。

极简牌组结构

极简Anki牌组结构

牌组名称 用途
00-全部 存放“有效”卡片
01-迭代 存放“待修改”卡片
99-归档 存放“废弃”卡片
  • 有效:需要学习/复习/记忆的卡片;
  • 待修改:内容不好影响记忆效果,需要修改的卡片;
  • 废弃:内容过时,已经不需要记忆的卡片;

“00-全部”牌组

Anki 中的“有效”卡片最终都是要内化到大脑记忆的,那么卡片也就不需要分类了。用易于记忆的方式组织好卡片的内容,记忆到大脑中后,大脑这台高端分类机器会自动分类的。
过度分类最大的弊端是破坏了“间隔重复算法”的有效性。 因为不同类别的卡片记忆难度是不同的,人为分类之后,你会常常在不经意间选择记忆轻松简单的牌组,而不是靠“间隔重复算法”自动为你选择当前最需要复习的卡片。
所以,要记忆的“有效”卡片请全都放到“00-全部”牌组。如果控制不住自己要进行分类,那么问自己“分类通常是为了区分重要程度,既然有不太重要的卡片,直接归档/删除即可,何必要分类?”

“01-迭代”牌组

Anki 卡片内容组织方式是使用 Anki 的难点,卡片内容无法一步到位,通常需要多次的迭代修改。如果多次复习某张卡片时都难以回想起来,那么主要有两种可能的原因:

  1. 没有理解卡片对应的知识,靠死记硬背;
  2. 卡片的内容组织方式不当,大脑难以记忆。

解决第 1 点问题的方式因人而异,毕竟 Anki 只是记忆工具。如何系统的学习和理解新知识超出了 Anki 的范畴,这方面大家可以求助于讲解学习方法的相关书籍。

第 2 点问题。目前我还没找到“间隔重复”学习理论的专著,只有知乎上的 Anki 爱好者们和 SuperMemo 的博客有一些零星的文章。卡片内容组织方面,推荐阅读 SuperMemo 的一篇博文《有效学习:组织知识的20条原则》[英文][中文]。文章表达的核心观点就是卡片不能把一大堆内容堆砌在卡片中,期望通过间隔重复的方式来记忆,这样是行不通的。卡片的内容要遵循“最小信息原则”,一张卡片只记忆一个极其简单的知识点。

按我的理解,不管是用问答的形式还是填空形式,一张卡片最好在 5s 内能快速回想出答案,快速、高频、精准的刺激对应的脑回路,才能形成长期记忆。 问题和答案没啥强关联,想半天想不出答案,或者答案是好几百字的一大段文字等,都是无法记忆的不合格卡片,需要转移到“01-迭代”牌组进行优化拆分后,再回到“00-全部”牌组进行记忆。

“99-归档”牌组

做卡片不易,要耗费很多时间精力,有时候看到过时无用的卡片不舍得删,所以存在这个牌组。由于存放在这个牌组的卡片都是“废弃”的卡片,所以牌组学习新卡片和复习卡片的数量都设置为“0”,以免出现数字提醒干扰。

总结

Anki 虽好,可不要瞎折腾。花太多时间在牌组的结构上就属于没有意义的瞎折腾,钻研卡片的内容组织方式才是对使用 Anki 真正有意义的事情^_^。

参考

[1] Anki 2.0 用户手册,https://www.ankichina.net/Index/ankishouce
[2] 有效学习——组织知识的20个原则,https://www.jianshu.com/p/163462164a5b

版权声明:自由转载-非商用-非衍生-保持署名(创意共享4.0许可证

I used to learn english by Duolingo.

Duolingo App

But Duolingo only has a little speak pratice, so i always try to find an better english speaking app.

At last year, ChatGPT became more and more popular. I thought may be some english learning applications could used the chatgpt’s AI feature to make a AI tutor. I searched by google, then i found the application “Speak”.It’s amazing app! I can speak to AI tutor, just like a real person.

Speak App

I think it may be helping me to speak english fluently in six months.

Buy an overseas mobile phone physical card

Tailand mobile phone card, AIS green card, message card, 10 THB delay validity a month, no voice and network traffic:
https://xunihao.net/product/thailand-ais

Taobao guarantee transaction, buy the “fill price difference(补差价)” product:
https://item.taobao.com/item.htm?ft=t&id=709261038665

Purchase 30 products, comment “Tailand mobile phone card, AIS green card, message card(泰国电话卡AIS绿卡短信卡)” at order form, the shopkeeper will deliver the card to you by expressage.

When you receive the card, plugin it into your 4G mobile phone, then visit the WeChat public account “Franwell弗兰威尔” to charge the card balance. At least 10 THB each charge to delay validity a month.

Notice! Delay validity a month because of a charge operate, the AIS not deduct each month. You can charge 12 times to delay a year.

About the card number:

Area code: +66

Country Name:Tailand

If number is 0998877666 (total 10 digit)

When you register any service account, select the country code +66, input the phone number 998877666 (ignore the first digit 0)

Register an overseas email account

Visit Proton(https://proton.me/), register an email account. Becase of Proton forbit the AIS phone number to verify account, you have to use your other email to verify it.

Register a chatgpt account

Some tips to increase the odds of success:

  1. Open web browser’s privacy model, avoid to be recognized that you are in chinese mainland.
  2. Proxy over the GFW to northern european countries, avoid to be restrict registion by Southeast Asia,HongKong,Macow’s IP address.
  3. Don’t use chinese email, recommend to use Proton email.

reference

阿里云的服务器忘记续费,导致之前用 Flask 搭的博客数据全没了。考虑了一下,还是用 Hexo 在 Github 上搭博客,本地和远端都有 Git 仓库保存全量数据,不容易丢失。虽然需要科学上网才能访问 Github,但是不会科学上网的人似乎也不需要看技术博客,所以网络问题影响也不大。

0%